Thursday, 30 July 2009

Up and running!


The Clodzilla is now a runner. Initial impressions are of a whole load of torque, although on the downside there is an equal whole load of flex in the steering assemblies. I know that ESP offer metal steering transfer joints to replace the stock plastic items, but these will not fix the not inconsiderable movement in their right angled servo mounts. I've mounted the fore and aft rods two holes higher on the servo bellcranks than the static range suggested, and this compensates for the flex to a degree, but this isn't the ultimate solution. The servo mounts pick up on the two standard motor mounts, unfortunately they would have been better if these items had been longer and had three mounting holes, possibly utilising the screw location on the very back ends of the gearboxes. I didn't cut off the standard servo mountings on the servos themselves so I may be able to make an additional brace using these.

As far as the radio set-up goes everything went fine. I've still got a bit of tinkering to do, particularly on the braking side because the truck stops a little too dead as soon as I take my finger off the trigger. I didn't need to reverse one of the channels as suggested below, and whereas someone on the forum (linked to below) had trouble getting his rear servo to work in both directions this was overcome by setting the CH3 value to zero where it had previously been set to 100, although I don't know what the default value was because I have a second-hand transmitter and I didn't reset it to the factory settings, instead I simply adjusted the values to those required.

There are still a few things to do, like touching up a couple of scratches and mounting the off/on switch. I've also got to remake the battery joining leads as I think I need a thicker cable at the paired end, I didn't have any 14 or ideally 12 AWG cable when I was making them, and anyway it was a trial run to get the lengths right. I've spurred off an extra pair of leads from the point where they join together to create a remote charging point because all the other joints are a bit inaccessable.

The truck now weighs in at just under 10lbs, discounting the shell. I will at some point (I've been meaning to do this for a while now) make a pair of gearbox skid plates which will extend to protect the lateral steering rods.

As soon as the sun shines again I'll be off to find some rocks...

Monday, 20 July 2009

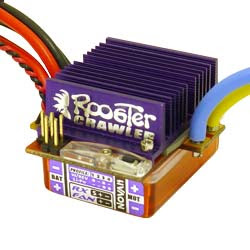
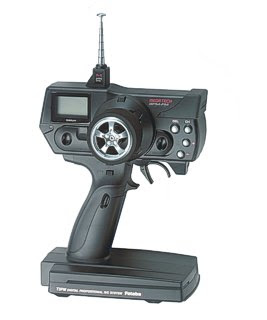
Setting up the Novak ESC and Futaba 3PM

The servos and motors are now fitted. I haven't connected the motors yet but the Novak crawler ESC setup is done.


In fact it does itself, you just connect the battery and switch it on WHILST holding the setting button down. The red LED goes on in under two seconds - release the button and apply full throttle and the green LED comes on - apply full brake and the green one flashes. That's it - done.


I've found the instructions for setting up the 3PM on a RCCrawler.com Bulletin Board. Here they are - with many thanks to and by courtesy of poster bbeaty:

Setting up Futaba 3PM for 4ws

For 4ws the front wheels turn opposite the rear (the same as if you had a reversing y-harness). When the SW2 button on the radio is moved the truck will steer only with the front (mixing turned off), and when the SW1 button is pressed the front wheels will turn the same as the rear enabling crab steering.

Setup Procedure:

To set this up you will need to have a servo plugged into the CH1 and CH3 positions on the radio. For now I’ll assume you have the front servo plugged into CH1 and the rear servo into CH3.

In the system menu setup a new model name in the radio, also while in the system menu, setup SW2 to be MX (programmable mixing) see pg 54 in manual if you do not know how to do this, and SW1 to Conditions 2 selection (pg 56).

Turn the radio on normally; I assume you know how to setup the front steering using the sub trims and EPA. If you need to reverse the front steering do this as well. In order to have the rear steer opposite from the front, the value for CH3 in the reversing menu needs to be opposite that of the steering. For example, if you need to reverse the front steering CH3 should not be reversed, and by the same measure if the front steering does not need to be reversed then you will need to reverse CH3.

To adjust the mixing settings see (pg 41). For a base value set both the right and left side values to +75. You will need to fine-tune them later using the same idea as setting the steering EPA. The master and slave settings are correct by default and then set PMX-MD to ON.

To test the settings try steering the truck, only the front tires should turn. Now if you move the SW2 switch the truck should steer normally with 4ws.

The rear steering will most likely need to be trimmed. The preferred method to trim the rear wheels is to use the sub trim menu and select CH3, then use the + / - buttons to align the rear wheels. Another method is to select CH3 in the main menu and again use the + / - buttons to align the rear wheels.

Here is where the Conditions 2 button you setup earlier comes into play. The conditions 2 button is setup as SW1 (button on the handgrip). When you press the button you will notice the LED will flash, verifying you are in the Condition 2. Now scroll though the menu and setup the mixing function again, however this time instead of setting the right and left values to +75 set them to –75. Now when you have the SW2 moved to activate mixing and have the SW1 button pressed, the front and rear wheels will turn the same direction and the truck will crab steer.

When mixing is turned off via SW2, you can set if you want only the front or rear wheels to steer by switching how the servos are plugged into the receiver (front on CH3, rear on CH1). Keep in mind when you physically switch the front and rear servos on the receiver you will need to readjust the trims, channel reversing, etc.

I'll try this all out tomorrow. X fingers...

First look (sneak preview)

Who can resist placing their bodyshell onto their truck just as soon as the chassis is done?


(I'll borrow a better camera just as soon as everything is finished!)

Saturday, 18 July 2009

The chassis is complete...


This chassis is now completely assembled. It was a bit of a struggle getting the batteries (which have now been swapped out for 4600mAh packs) into place, being as they squash a fair way into their foam rubber padding. At least they don't require any additional retaining devices like cable ties or similar. The articulation looks good, and nothing contacts anything else where it shouldn't.


One thing that needs a bit of adjustment is the positioning of the cantilever-to-axle rods, being as they cant in different directions due to the fact that the main gearbox is not central to the main longitudinal axis of the truck in the first place. A small spacer with a longer screw on the right hand (as viewed here) side of each axle will do the trick. The plates that mount the rods to the axle stays haven't been painted yet because they are due to get trimmed (being as they are a universal left/right/front/back item). Also, the mounting holes which pre-exist in the axle stays are vastly oversize in the first place, so they need a bit of packing - I've done this before with M3 spring washers as they are the right size - unfortunately I haven't got any here right now. The next thing to do is to mount the new motors (along with their 9T pinions and adjustable motor mounts) and the steering servos.

One thing outstanding is to sort the differentials. I've got plenty of choices here:

1. leave them standard, which is going to help the steering but harm the traction;

2. lock the existing ones with something like JB weld or hot glue, which is going to do the complete reverse;

3. buy a pair of new output gears, which does away with the differentials all together;

or 4. buy Integy ball differentials, which are essentially limited-slip devices (and also the most expensive option).

There are also 5th to 7th options, all of which are to just lock up or semi-lock the rear end alone (by one of the three methods above).

Hmmm. A bit more thought is required!!

Friday, 3 July 2009

Meantime...

My backyard basher truck:


This started out as a child's toy New Bright Motorsports truck. As RC vehicles go, it was pretty poor. It took the whole width of a road to do a 'U' turn, was either going flat-out or was stopped, and had trouble accelerating (read getting going) on 2" long grass. So I improved it (no end). The same shell now resides on a Tamiya TL-01B Baja King chassis. It wears F350 wheels and tyres, has a full compliment of ball-bearings, uses a Futaba MC230CR ESC and carries a 2400 mAh battery. Great fun. I love it to bits.

Wednesday, 1 July 2009

Motor choice

This project is being funded in large part by the sale of unwanted motorcycle parts. I've sold a pair of 1970's Suzuki GT250 fork legs for £39.99 this week, so this was my basic budget for a pair of motors. Suitable 540 size motors for a Clodbuster/Clodzilla project come in a lot a variations with regard to the winding turn count - the stock motors are reported to be either 23 or 27 turns, with lower turn counts giving higher RPM and higher counts giving greater torque at the price of much lower peak RPM. Typical values here (for Team Atlas Rock Climber Motors) are: 40T 11000RPM, 60T 8030RPM, 70T 6700RPM, 80T 5940RPM, 90T 4730RPM and 100T 3850RPM.

Purist rockcrawling motors have turn counts running up to about 110 turns, but this is far too extreme for me, what with the 10 tooth pinions I have bought this would give me a top speed far less than walking pace, maybe as low as 1 1/2 or 2mph.

My design criterion requires motors in the 35-50 turn range (being as my ESC has a rating of anything down to two 35t motors), and the budget was £20 tops for each motor. This narrowed the field down to about four final choices:

Atomic (various turns):


$21.00 each (£12.75) + $16.00 P+P (from San Gabriel, California).

Venom Fireball 50:


£17.99 each + £2.00 P+P (from West Yorkshire).

Integy 45t:


$17.99 (£10.92) each for the V10 version, $33.99 (£20.64) (discounted from $37.99) + $9.84 (£5.96) P+P for the V11 (from Salt Lake City, Utah)

Final choice - Tamiya 35t (54114):


£39.00 + £2.00 P+P each here in the UK; or $23.95 (£14.54) + $7.50 P+P from Hong Kong. (You can guess which I choose!)

The blurb says:

"When rock crawling, it is very important to have a motor that provides the appropriate amount of torque required, to give you more control over the vehicle. Tamiya is releasing the CR-Tuned Motor (35T) to meet the needs of all Rock Crawlers."

"This CR-Tuned Motor (35T) is perfect for rock crawing machines that run at low-speeds and need precise acceleration inputs."

The specifications say:

For: CR-01 Chassis Vehicle, Big Tire Trucks, Touring Cars and M-Chassis Vehicles

MAX RPM is reduced to focus on increased torque.

Features smooth power transfer and long endurance.

Black motor body with an end bell that acts as a heat sink.

0 Degree lead angle for consistent performance.
(Meaning I don't have to reverse the direction of the rear motor to suit the Clodbuster configuration.)

Replaceable standard type brushes.

Turns: 35T

Voltage: 7.2V

RPM when not loaded: 12,000 RPM (7.2V)

Motor Size: 540

Gear Ratio: 32.4~50.6

Max. Torque: 36.7mN-m (7.2V)

I hope they are good. Everything just about stops now for a couple of weeks until they arrive. I may well have a go at making skid plates for the gearboxes and under the centre body in the meantime. Back to the workroom benches we go...